Improvements and Additions to the Electronics in Cholula Red
Full House Surge Protector
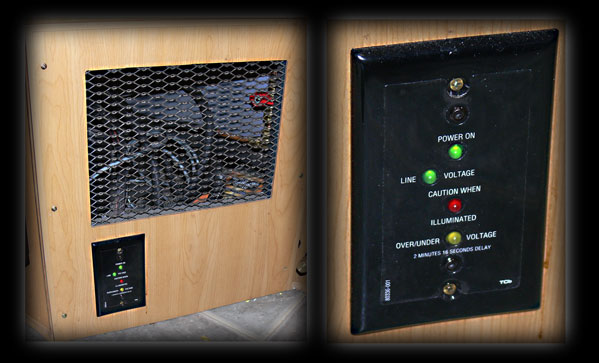
One of the first electronic improvements we made to Cholula was the addition of a hard wired full house surge protector. While our camping style is about half boondocking and half electrical (in New Mexico, with a State Park Pass, you can dry camp for free, or get a site with electricity for $4.00), we figured it would be better to be safe than sorry.
This unit is hard wired under our kitchen sink with a display panel mounted on the front of the cavity door, so we can always monitor when we plug in or start our generator. With the display panel, we have a two minute time period in which to decide whether or not to use the power at the pole. Of course we also check at the pole before plugging in; however we feel this is a great, inexpensive insurance policy for all the electronics in the rig.
Much Improved Tank Gauges
As much as I love our Lazy Daze, there are a few things that I feel could use improvement. One item that has always bugged me has been our tank gauges. The original gauges are located on the range hood, measure capacity in thirds, and, for my money, have never been very accurate. When we would dump, the black tank would very rarely read empty no matter how much we flushed the tanks. Then it would jump to 2/3 full very quickly, then to full soon after. The grey and fresh weren't much better. For folks who hook up most of the time, this isn't a huge deal, but we like to boondock, and accurate gauges take on a new importance when you have to pack up the rig just to go dump!
Our first attempt was with a set of external gauges and a beautiful monitor from Vena Corporation. This was a very slick set up and we had high hopes for its success; however after installation and numerous hours on the phone with Vena, we were never able to get these gauges to read anywhere near accurate. At this point, we were getting pretty frustrated. Fortunately, Vena understood that there was some kind of problem with their unit and refunded our money. The unit we were using is no longer offered by them, so we continued our search.
After discussing it with friends, Art Bergreen, a fellow Lazy Daze owner told us that he had had good luck with the gauges from Garnet, a company out of Canada. After a bit of research, we found a system we liked here. We called the folks at the RV Upgrade Store and explained the hassles we had been through. These folks were super and assured us that they would give us all the assistance we needed with installation. They also guaranteed that if the gauges didn't work in Cholula, we could return them for a refund.
Well, this was good enough for us, so we placed the order (and our friend Andy liked them so well, he had us order two!).
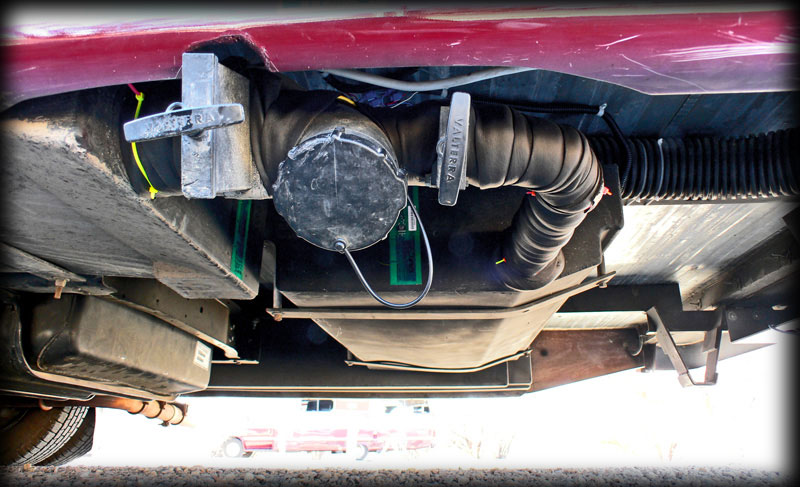
These gauges are completely different from our original gauges in that these sensors sit on the outside of the tanks and measure the liquid through the walls of the tanks. Our original gauges has sensors that are inserted directly into the tank, thus making them susceptible to fouling if "matter" got stuck onto them. In my way of thinking, these internal probes are just waiting to fail. The new sensors are three inches wide and one is placed onto the outside of each of your tanks (fresh, black and grey). In the photo below, you can see the green sensors as they are attached to both our black and grey tanks.
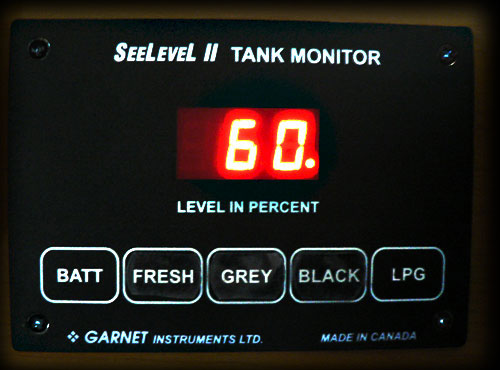
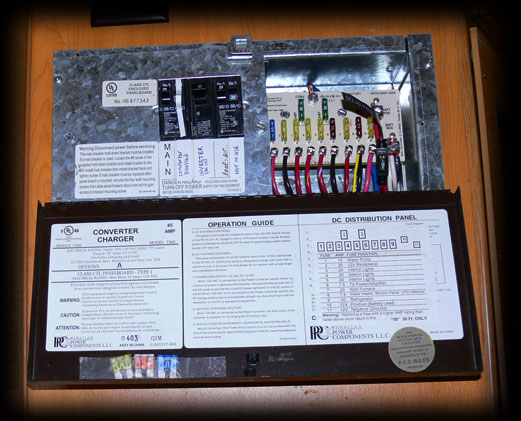
One single two wire digital cable is used for all the sensors. Each sensor sends error corrected data to the panel in the coach. As these sensors required no calibration, we were quite relived after our our hassles trying to calibrate our previous gauges. The new panel also reads the state of our battery and our propane level (via the probe originally installed in the rig).
We have now been using these gauges for over a month, and finally, our search for accurate gauges is over! In case you're interested, the SeeLevelII unit cost $205.00 and we feel it's worth every cent.
We have now been using these gauges for over a month, and finally, our search for accurate gauges is over! In case you're interested, the SeeLevelII unit cost $205.00 and we feel it's worth every cent. Below is a photo of the monitor that is now installed inside of the rig.
Cel Phone Booster
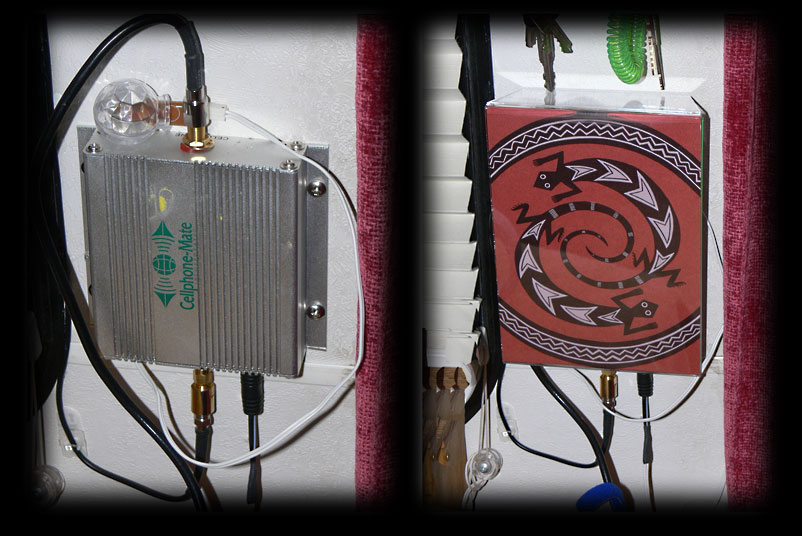
While we were out in Moorcroft, Wyoming, Andy had a kidney stone attack, and since we were so far out in the boonies, we had no phone service. Fortunately, Andy had installed a cel phone signal booster in Gertie and we were able to contact the local hospitals to see about treatment. It turned out that we were 40 miles from one hospital to the east and 50 miles from a hospital to the west. We were just about ready to head east when we used his booster to call the hospital. As it turned out, the closer hospital had no one on call that day, so we went west where we were able to get him medical attention.
This one incident was enough to convince me that we needed a similar device. After an internet search, we ordered this 3w Booster Amplifier Package. The amp came with an antenna which we mounted on the roof, then we fed the cable through the refrigerator vent and mounted the unit right by the door. Andy and Terry then fed a line up to the cabinets and hardwired the unit to 12v so it can be turned off and on at the booster instead of having to plug it in every time. This is still a work in progress as I hate the ways it looks, but I love its functionality. My first attempt has been to place an acrylic picture frame over the unit with a picture inside, but it's not really the right size so the search continues. Once I have an appropriate cover, I will secure all the wires and it should look a lot nicer.
Just a note, we are currently staying at Santa Rosa Lake, in New Mexico. Our reception waivers in and out from second to second, but once we plug in to the booster we get four bars and can talk as long as we like. Ain't technology great?
<
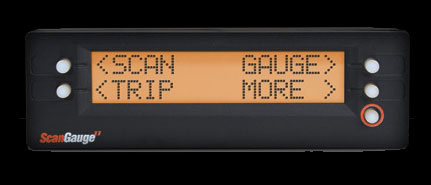
ScanGauge II
We first read about this little gadget on the Life With a Lazy Daze RV Group on Yahoo. It's from a company named Linear Logic and the product is a ScanGauge. It plugs into your automobiles computer port and can read all the information from your engines computer, such as RPM, temperatures, and a ton of other information. The best news of all is that this gizmo will read error codes when something goes wrong with your engine (as recently happened to us, but that's ANOTHER page to be posted later).
We also really like that this will read your immediate gas consumption. So as you're driving down the road, you can see how your different driving habits affect your gas mileage, pretty cool, huh?
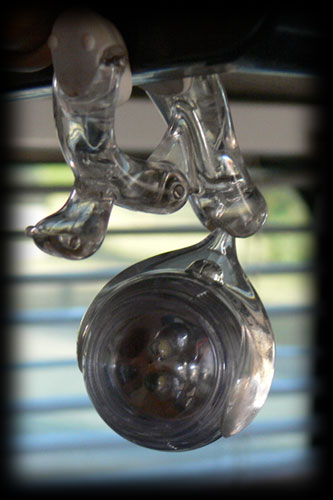
Eyeball Lights
While these little lights barely come under the heading of electrical, I didn't know where else to put them. We found these at Costco shortly after we got Cholula and have used them ever since. Since everyone we've shown them to seem to love them, I wanted to show them here. These little lights are round, just like eyeballs, and they come with a clip so you can put them anywhere, on your clothes, your hat or somewhere in the rig. Each light contains three LEDs, very bright, nice and tiny and just perfect for use in a motorhome. If you're interested, you can find them here.
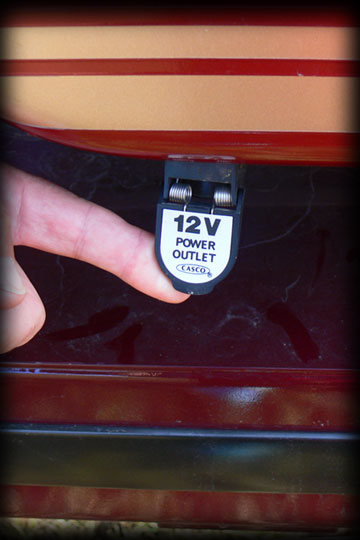
Extra Outlets
While we got as many extra outlets as Lazy Daze would provide, we found we still needed more (imagine that!). Once again, we went to Andy, who put another 12v outlet at the foot of the passenger side twin bed in Cholula (we already had a 12v at the head of the drivers side bed). This gave us two 12v outlets in the bedroom and two more in the living room (one by the drivers side table and another over the passenger side couch). With all these outlets, you'd think we'd be happy, but we still felt the need for just a few more 12v outlets, just for convenience sake.
When Andy and I started working on some kind of outdoor lighting for the satellite dish (we travel with a Dustyfoot Internet Satellite),we went through several different versions. These included a battery operated light, a solar powered light (which is pretty cool, pictures to come on another page) and finally a really nifty color changing light that really brightens up the dish at night. Alas, the only way to power this one was to add another 12v outlet to the back of the rig. We decided that the best spot was under the spare tire cover. For now, we finally have enough 12v outlets (unless we decide to put one by the front door for Christmas lights . . .)
a Link 10 Battery Monitor, Extra Solar, a New Charger/Inverter
We had been out in Cholula for about nine months when we realized that we were going to need to boost our power a bit. Since I am such an internet hound, I tend to keep the modem on most of the time. Besides which, while we found we were doing ok in the summer, we were beginning to wonder what would happen to us in the dead of winter?
With this in mind, we started trying to assess our energy consumption. Try as I might I just couldn't wrap my head around the whole amps, watts, volts idea. I had VERY good teachers, but it just wasn't sinking in. Finally, we broke down and purchased a Link 10 Battery Monitor and from there, everything just sort of fell into place.
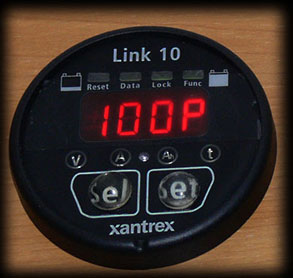
Now that's not to say it's a magic device. It took me probably two weeks to actually figure it all out, but with my trusty manual and a lot of time and patience, I started getting our true energy picture. It wasn't too long before we began to realize that if we really wanted to full time and boondock for extended periods of time, we needed a boost.
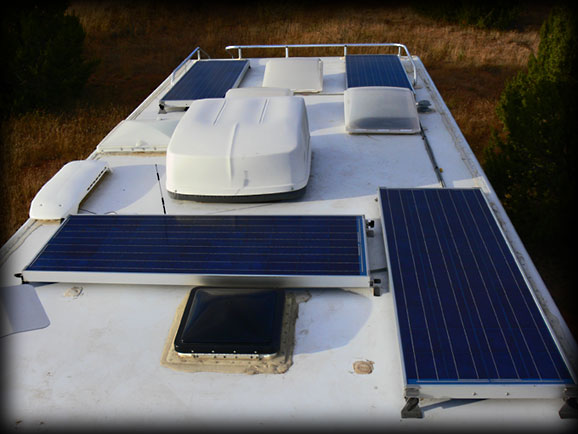
Our next decision was how much solar and what other improvements should we make? We had decided on at least one more 100w solar panel (Cholula had two 100w panels from the factory) and probably a new charger. In looking around we decided that in addition to a beefier charger, a full house inverter would be a great addition. With this in mind we decided we would get a ProSine 2.0 Inverter/Charger. The shocker came when we started looking to purchase one, these babies are expensive, generally $1,500 to $2,000! After a bit of internet searching, we finally found one from Defender , a marine outfitter out of Conneticut, and the best part was they were selling it for $1,169, just a bit over $1,200 with shipping. While that is still a hefty chunk of change, this unit got excellent reviews and had everything we were looking for.
Our next step was to contact AM Solar about our new panels and the installation. When we called, we learned that they had two used 100w panels for a considerable savings, so we opted to max out the rig.
We made our appointment and went to Eugene, where AM Solar installed our two new solar panels, the ProSine 2.0 and upgraded our HPV22 to an HPV22B (better in case we ever decide to get AGM batteries). Hopefully now, we're good to go!
Below is a picture of Cholula's roof with her new solar panels installed.
A Word About Fuses . . .
I just thought I'd share something that we picked up along the way (if I could remember where, I'd certainly give credit, but I honestly don't know where we first heard this). One of the most annoying things that can happen is to blow a fuse, then spend an inordinate amount of time trying to find just the right fuse for a replacement. Having done this so many times, we've learned to keep one of every type of fuse that might be needed taped to the inside of the panel door.
A simple thing, but it feels like a small miracle when it's needed.
![]() This Website was created on a Mac by Kate Klein
This Website was created on a Mac by Kate Klein